To create a custom business event, we would need following three artifacts.
·
BusinessEventsContract class
·
BusinessEventsBase class
·
A Trigger Class to send the business
Event
BusinessEventContract Class :
[DataContract]
internal final class DaxCustomerBusinessEventContract extends BusinessEventsContract
{
private CustAccount custAccount;
Private CustName customerName;
/// <summary>
/// Initializes the field values.
/// </summary>
private void initialize(CustTable _custTable)
{
custAccount = _custTable.AccountNum;
}
/// <summary>
/// Creates a <c>DaxCustomerBusinessEventContract</c> from a <c>CustTable</c> record.
/// </summary>
/// <param name = "_CustTable">A <c>CustTable</c> record.</param>
/// <returns>A <c>CustomerCreatedBusinessEvent</c>.</returns>
public static DaxCustomerBusinessEventContract newFromCustTable(CustTable _custTable)
{
var contract = DaxCustomerBusinessEventContract::construct();
contract.initialize(_custTable);
contract.parmCustAccount(_custTable.AccountNum);
contract.parmCustomerName(_custTable.name());
return contract;
}
[DataMember('AccountNumber'), BusinessEventsDataMember("@Dev:AccountNumber")]
public CustAccount parmCustAccount(CustAccount _custAccount = custAccount)
{
custAccount = _custAccount;
return custAccount;
}
[DataMember(identifierStr(CustomerName)),
BusinessEventsDataMember("Customer name")]
public Name parmCustomerName(Name _customerName = customerName)
{
customerName = _customerName;
return customerName;
}
private void new()
{
}
public static DaxCustomerBusinessEventContract construct()
{
DaxCustomerBusinessEventContract retVal = new DaxCustomerBusinessEventContract();
return retVal;
}
}
BusinessEventsBase class :
[BusinessEvents(classStr(DaxCustomerBusinessEventContract),
"Dev:DaxCustomerCreatedEvent","Dev:DaxCustomerCreatedEventDescription",ModuleAxapta::Customer)]
public final class DaxCustomerBusinessEvent extends BusinessEventsBase
{
private CustTable custTable;
private CustTable parmCustTable(CustTable _custTable = custTable)
{
custTable = _custTable;
return custTable;
}
private void new()
{
super();
}
public static DaxCustomerBusinessEvent construct()
{
DaxCustomerBusinessEvent retVal = new DaxCustomerBusinessEvent();
return retVal;
}
[Wrappable(true), Replaceable(true)]
public BusinessEventsContract buildContract()
{
return DaxCustomerBusinessEventContract::newFromCustTable(custTable);
}
static public DaxCustomerBusinessEvent newFromCustTable(CustTable _custTable)
{
DaxCustomerBusinessEvent businessEvent = DaxCustomerBusinessEvent::construct();
businessEvent.parmCustTable(_custTable);
return businessEvent;
}
}
A Trigger Class to send the business Event :
[ExtensionOf(tableStr(CustTable))]
public final class DaxCustTable_Extension
{
public void insert(DirPartyType _partyType, Name _name,boolean _updateCRM)
{
next insert(_partyType, _name, _updateCRM);
if (BusinessEventsConfigurationReader::isBusinessEventEnabled(classStr(DaxCustomerBusinessEvent)))
{
DaxCustomerBusinessEvent::newFromCustTable(this).send();
}
}
}
Activate the custom Dynamics 365 FO business event
The
Business Event catalog doesnt get automatically refreshed. To refresh the
Business Event catalog, go to
System Administration -> Business Event
Catalog -> Manage -> Rebuild business event catalog
Once rebuild is complete, the new business event
would be added to the list .
To Activate
the BE you need a endpoint. Before Activation create a end point.
System
Administration >Setup>Business Event catalog>Endpoints
Activate
the Business Event and assign the end point to the business event. Once it is
activated, the business event should appear in the “Active events” tab.
Power Automate flow :
· Go to the Power Automate portal.
·
On the left pane click Create to start a new
flow, select Automated cloud flow.
·
Name the flow and find the following trigger,
click Create.
In the Instance
setting provide a link to your Dynamics 365 F&O environment.
After the one is
provided, Power Automate will connect to the environment via the link and
gather available business event information. After the Category is selected,
user may select the exact Business event with binding a company. In case a
company is not set, the event is active for all companies.
Parse
business event data from JSON :
Previous step makes customer data available in JSON format.
To use it further it makes sense to parse it using "Parse JSON" step.
Click "New step" and find the appropriate step,
select "body" in Content field (this is the customer information JSON
string that we have received from Dynamics 365 F&O on the previous step).
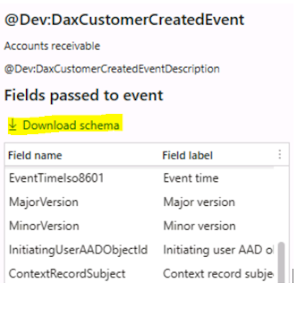
Now we need to provide a JSON schema so the step is able to
parse the data correctly. To generate a schema from sample, go to the System
administration -> Setup -> Business event catalog form, find the created
business event, go to details at the right of the form, click Download schema
button.
The button will generate a
JSON sample string for this particular business event. The string may be used
for "Generate schema from sample" function while setting up Parse
JSON step.
Send a message via Teams :
Finally, we were
asked to send a message via Teams containing customer information.
Click New step to
add "Post message in a chatbot or channel" step. Enter a channel or a
user that should receive the message on new customer creation and save the
flow.
Test Power Automate flow :
In Dynamics 365
F&O go to Accounts receivable -> Customers -> All
customers and create a new customer. After the customer is
created, the user or channel you specified at the Teams setup step should
receive a message via Teams that looks like the following:
If we click the link, the system will open "All
customers" form showing the newly created customer only.


No comments:
Post a Comment